
My name is Katie Bennett and this summer I had the wonderful opportunity to work for Embecosm in between my A-levels and university. My objective was to create a remote weather station to use as a case study for the MAGEEC WAND.
Previous to this experience, the only project I had done was coding a robot car in the Arduino IDE, a project that had nothing to do with WiFi. I had never even done any research on WiFi protocols or the internet prior to this project so it seemed a monumental task. However I was prepared to be tested and challenged in order to complete my goals.
Firstly I had to decide how I was going to communicate with the station as it would be remote. The best idea seemed to be WiFi communication as it had the highest data/distance ratio as opposed to Bluetooth or Zigbee. Here I came upon the first obstacle: which mirco-controller is able to communicate over WiFi and be low powered at the same time?
At this point I had to get some outside help. Fortunately Brian Jones, who works at the computer labs in Cambridge, kindly agreed to meet me to discuss this issue.
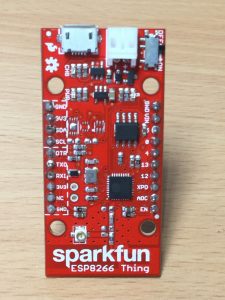
After travelling to the labs on my very first business trip and talking to him, it was clear which was the ideal mirco-controller: the ESP8266. The ESP8266, produced by Espressif Systems, has full TCP/IP stack while being both low cost and low power. It is also programmable in the Arduino IDE, with which I was already familiar. For my project, I chose the ESP8266 SparkFun thing, which can be powered by a lithium polymer battery or USB port.
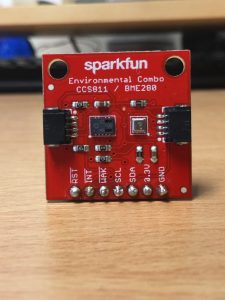
Next I needed to find a sensor to take measurements. While looking, I came across a SparkFun product called the SparkFun Environmental Combo Breakout. It uses two sensors; the CCS811 which measures CO2 and TVOC (Total Organic Volatile Compound) levels as well as the BME280 which measures temperature, humidity and pressure. It can be easily connected to the ESP8266 SparkFun Thing.
After connecting the ESP8266 and the sensors together, I had to write a program that would allow the data to be sent from the sensors and over the WiFi to my laptop.
Fortunately while researching how the ESP8266 WiFi works, I came across an extremely useful article called ‘A Beginner’s Guide to the ESP8266’. Not only did this article explain the four different layers of the internet, it also explained how to code a data-logging program. Perfect! The program was available on GitHub but required a different sensor to the ones I was currently using. After combining the data-logging program with a program from the SparkFun website, along with a bit of debugging, I had written a program for the ESP8266 which takes a set of measurements and sends them over WiFi in a csv file. A second program on the laptop then receives the csv and plots the data via Google charts.
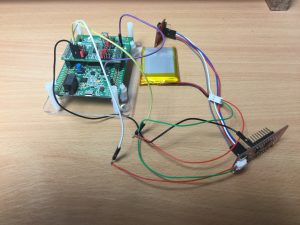
This meant I had made a weather station capable of communicating remotely while being powered by a battery.
However I did not know how long the station could last on battery power or how much power the station was consuming. Needing it to be as low power as possible, I knew I had to test how much energy it was using.
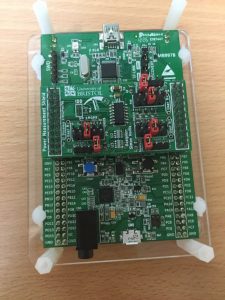
To do this I used the MAGEEC WAND, a board that allows you to measure average power consumption over a certain time period. For more information on the MAGEEC WAND, see http://mageec.org/.
To decrease power consumption, I experimented with changing power modes on each component.
Firstly I could put the BME280 in a different power mode of which there were three: sleep, normal, and forced. The BME280 sensor library has an example program of forced mode, which was the appropriate power mode to use as it would wake the BME280 from sleep periodically to take a measurement. It was very easy to incorporate into the code.
The second was a bit more difficult to achieve. There was no example code to demonstrate a low-power mode for the CCS811 on the Internet. After a lot of searching I came across a website that explained how to change the sampling rate within the CCS811 source code.
Finally I found 3 different sleep modes for the ESP8266. Unfortunately none of them maintained the WiFi connection therefore using any of the sleep modes would prevent the station from communicating remotely. Even so I was interested to see how the different power modes compared.
Here are my results for each of the power modes for each component:
| Average Power (W) over a 120 second period | |
| Default | 0.1663 |
| ESP8266 Deep Sleep Mode | 0.1209 |
| ESP8266 Light Sleep Mode | 0.1467 |
| ESP8266 Modem Sleep Mode | 0.1441 |
| BME280 Forced Mode | 0.1659 |
| CCS811 Sample rate every 60 seconds | 0.1663 |
The biggest energy reduction of 27% was achieved by using the deep sleep mode on the ESP8266 whereas changing power modes on the sensors had a much smaller effect.
For my project I used a 2000mAh lithium battery. Supposing the program uses an average power of 0.1660 watts and voltage of 3.7v, with perfect efficiency, it should last 44.6 hours. This is not suitable as the battery would need to at least a year to be sufficiently remote.
Further work is needed to take advantage of the ESP8266 sleep modes. Although these modes are incompatible with WiFi, it would be a good extension to this project to find a way to work around that. One way would be to write new code that does not require the board to be constantly communicating.
This project has used energy monitoring hardware to quantify the impact of energy optimisation efforts . Next time I could pinpoint which component uses the most energy, and investigate how to reduce its consumption. For instance if the processor is using a lot of energy, compiler tuning could be applied to make the software use the hardware more efficiently. If the LED is taking a significant amount of power it may be a good idea to disable it permanently.
I achieved my goal of making a remote weather station and using it as a case study for the MAGEEC project. It can take measurements of the temperature, pressure, CO2 and others for nearly two days and I have identified how this work could be extended in future to make further gains in energy efficiency. I also made significant steps in improving my programming skills as well as my knowledge of networking and now I am confident I could take this project further.