| Services - tools - models - for embedded software development |
|---|
| Services - tools - models - for embedded software development |
|---|

Application Note 2. Issue 3
November 2008
Copyright © 2008 Embecosm Limited
 | The document entitled " The OpenCores OpenRISC 1000 Simulator and Tool Chain " by Jeremy Bennett of Embecosm is licensed under a Creative Commons Attribution 2.0 UK: England & Wales License. See the Legal Notice for details. |
Table of Contents
Many of the other application notes and technical papers written by Embecosm make use of the OpenCores OpenRISC 1000 simulator and tool chain in examples. Since these systems are made available under open source licenses, they are a convenient base for examples that can be used freely.
This application note supports these existing application notes and technical papers by documenting how the OpenRISC 1000 Or1ksim architecture and its associated tool chain should be installed. It also provides examples of the simulator and tool chain in use, including a recent Linux kernel.
Issue 3 of this application note is updated to use release 2.0 of the port of GDB 6.8 and Linux kernel version 2.6.23. A number of clarifications have been added in the light of user feedback on issues 1 and 2.
Embecosm is a consultancy specializing in open source tools, models and training for the embedded software community. All Embecosm products are freely available under open source licenses.
Embecosm offers a range of commercial services.
Customization of open source tools and software, including porting to new architectures.
Support, tutorials and training for open source tools and software.
Custom software development for the embedded market, including bespoke software models of hardware.
Independent evaluation of software tools.
For further information, visit the Embecosm website at www.embecosm.com.
The OpenRISC 1000 project forms part of the OpenCores organization (www.opencores.org). Its aim is to create a free open source computing platform, comprising:
An open source 32/64 bit RISC/DSP architecture;
A set of open source implementations of the architecture; and
A complete open source tool chain and operating system.
The OpenRISC 1000 project has resulted in Verilog for a 32 processor core, the OpenRISC 1200 (sometimes known as OR1200) and a complete reference System on Chip (SoC) design using that core, ORPSoC.
The OpenCores website provides three mechanisms for obtaining the tool chain.
The simplest method is to use a virtual Ubuntu image running under VMware. Details of this can be found at www.opencores.org/projects.cgi/web/or1k/vmware_image.
To install the tools native on a Linux platform, OpenCores provides a script, which will download, patch, build and install all the tools. Details of this can be found at www.opencores.org/projects.cgi/web/or1k/gnu_toolchain_port.
Finally there are a set of basic instructions for building the individual tools. These are somewhat out of date and consigned to a legacy web page (see www.opencores.org/projects.cgi/web/or1k/gnu_toolchain_port_old). These can be slightly out-of-date, and are usefully supplemented by Rich D'Addio's Meansoffreedom (MOF) website.
This application note recognizes that a virtual image or a pre-packaged script may not provide the detailed control over tools, or access to the latest versions required by some users. It brings together the legacy instructions from the OpenCores website with the extensions from MOF and updates them for 2008.
The precise details vary depending on the environment used. The examples given below were all verified on a workstation using GCC 4.3.0 under Fedora 9 Linux. The procedure should be very similar under other Linux versions.
This application note describes several components of the OpenRISC 1000 project:
GNU binutils, GCC and GDB from the GNU tool chain port;
the Linux kernel;
the uClibc library and
the Or1ksim architectural simulator.
![[Note]](./images/note.png) | Note |
|---|---|
The GNU tool chain (binutils, GCC, GDB) is built for a cross-compiling environment. In other words the tools are designed to run on the development workstation, but generate code for the target (OpenRISC 1200) architecture. |
Each tool in the tool chain is built from its source code. In all cases the source code is derived from the standard source code by patching with changes required for OpenRISC 1000. So for each tool there will be one source distribution to download (typically as a compressed tar file) and one or more patch files (typically compressed).
Locations of the patch files for each tool are noted here. Where more than one location is given for the same item, they represent alternative download points for the same file.
| Note |
|---|---|
Some of these are FTP sites and some HTTP site. All should be accessible through a web browser using the link shown. Downloads from the OpenCores website requires a login (which is free). Some other downloads may require login and password, which are given in the table. |
The use of these source distributions and patches is described in the sections of Chapter 3 relevant to each tool.
In general the OpenCores website (www.opencores.org) provides patch files for tools from third parties (e.g. GCC), rather than the full source code tree (See Section 3.1.1 for an example of how to apply a patch file.). In general the OpenCores CVS tree contains only the files that differ from the standard source code of the tool and a diff file to apply those changes to the standard source code.
binutils provides the basic GNU utilities required by the remainder of the tool chain. The tools are addr2line, ar, as, c++filt, ld, nm, objcopy, objdump, ranlib, readelf, size, strings and strip.
![[Important]](./images/important.png) | Important |
|---|---|
Having built and installed binutils, don't forget to follow the binutils specific instructions in Section 3.1.4. |
Download clean versions of the distribution and the patch file for OpenRISC 1000 from the locations given in Section 2.3. The patch file from MOF is recommended rather than the patch file which can be found on the OpenCores website, since it fixes a major bug in binutils.
| Important |
|---|---|
Ensure the version number (2.16.1) of the distribution is exactly the same. |
Unpack the downloaded source code and apply the patch file.
All the GNU components build in a directory separate from the original source tree. A configure script is used from within this build directory to generate a make file suitable for the particular component.
The configure script has a huge number of parameters (try
configure --help). Two are common to building the
OpenRISC 1200 tool chain.
--target=architecture
The configuration has been extended to understand the OpenRISC
32 bit architecture if the --target option is
set to or32-uclinux. The name of the
target architecture was chosen, since the work was originally
aimed at supporting uClinux.
--prefix=install
This specifies the directory in which all the components will
be installed. The default (typically
/usr/local) is not appropriate, since
these are not tools for the workstation, but to cross-compile
for the OpenRISC 1200 core. It is important that the same
installation directory is used for all the components
built. The examples here all use
/opt/or32 as the install directory.
For example if the source code has been downloaded and patched in a
sub-directory, binutils-2.16.1, then from the
parent directory (i.e. the one containing
binutils-2.16.1), the following commands would
be appropriate.
mkdir builddir_binutils
cd builddir_binutils
../binutils-2.16.1/configure --target=or32-uclinux --prefix=/opt/or32
Having configured the component, there are then three steps to building and installing the component.
Build the component in the build directory.
Carry out tests to ensure the component has built correctly. This will be of limited use here, since the goal is to build a cross compiling tool chain, the results of which will not run in the development environment.
Install the component in the directory specified when configuring.
For example if a build directory has been created as in Section 3.1.2, then the following commands would be appropriate.
make all
make install
The result is a set of cross platform commands installed in
/opt/or32/bin:
or32-uclinux-addr2line,
or32-uclinux-ar,
or32-uclinux-as,
or32-uclinux-c++filt,
or32-uclinux-ld,
or32-uclinux-nm,
or32-uclinux-objcopy,
or32-uclinux-objdump,
or32-uclinux-ranlib,
or32-uclinux-readelf,
or32-uclinux-size,
or32-uclinux-strings and
or32-uclinux-strip.
In addition there is also a further sub-directory,
/opt/or32/or32-uclinux/bin (observe the extra
or32-uclinx), which provides the main
cross-platform commands without their prefix
(ar, as,
ld, nm,
objdump, ranlib and
strip). This will be required by later component
builds.
The key final stage is to add the new cross-platform utilities to the search path, so they can be found in subsequent stages. For sh and bash users:
export PATH=/opt/or32/bin:$PATH
For csh and tcsh users:
setenv PATH /opt/or32/bin:$PATH
![[Tip]](./images/tip.png) | Tip |
|---|---|
It is useful to add these environment setup commands to
|
A compiler is closely tied to its associated operating system and libraries, in this case Linux and uClibc. Eventually the GCC compiler has to be built in parallel with both of these (see Section 3.6.1). However, initially a plain compiler without knowledge of operating system or libraries suffices.
Download clean versions of the distribution and the patch file for OpenRISC 1000 from the locations given in Section 2.3. The recommended patch file comes from the MOF website. It is identical in content to the patch file which can be found on the OpenCores website, but is compressed, which saves bandwidth.
| Important |
|---|---|
Ensure the version number of the distribution (3.4.4) is exactly the same. |
Unpack the downloaded source code and apply the patch file (See Section 3.1.1 for an example of how to apply a patch file.).
Like binutils, GCC is built in a separate build directory. It is configured to create just a cross-compiler for C.
mkdir builddir-gcc
cd builddir-gcc
../gcc-3.4.4/configure --target=or32-uclinux --prefix=/opt/or32 \
    --enable-languages=c
The configuration will automatically assume that the various
binutils utilities are prefixed by the target name, so finds
or32-uclinux-as as the assembler and
or32-uclinux-ld as the linker, so long as they
are on the search path (in this example
/opt/or32/bin).
| Note |
|---|---|
These instructions are simpler than those given on the MOF and OpenCores websites. At this stage the objective is a vanilla cross-compiler, without reference to the Linux operating system or uClibc libraries. No additional configuration flags are required. |
The procedure is the same as that from binutils (see Section 3.1.3). As before the use of make check is omitted, since it is of little meaning in a cross-compiling environment.
make all
make install
Five new commands are now available in the installation
bin sub-directory:
or32-uclinux-cpp,
or32-uclinux-gcc,
or32-uclinux-gcc-3.4.4,
or32-uclinux-gccbug and
or32-uclinux-gcov.
In addition gcc without its prefix appears in the
/opt/or32/or32-uclinux/bin directory.
The installation has also set up a GCC library hierarchy in
/opt/or32/lib/gcc/or32-uclinux/3.4.4. As well
as the main GCC library, this includes fixed versions of include
files. These are not relevant at this stage, but will be
important when the Linux and uClibc installations are created
and fixed versions of their header files are required.
GDB is not essential to getting a working Linux environment for OpenRISC, so this step may be omitted initially.
This section documents release 2.0 of the GDB version 6.8 for the OpenRISC 1000. This implements the GDB Remote Serial Protocol (RSP) for OpenRISC 1000, thereby enabling the GDB target remote and target extended-remote commands.
| Important |
|---|---|
This is now the recommended protocol for connecting GDB to OpenRISC 1000 targets. |
Previously, the OpenRISC 1000 port of GDB only worked through the JTAG port of the processor, which had to incorporate a working debug unit. The connection to the target could either be through the parallel port to physical hardware connected via a JP1 header, or via TCP/IP to a remote target. Communication to the remote target was via the proprietary OpenRISC 1000 Remote JTAG Protocol.
| Important |
|---|---|
The OpenRISC 1000 Remote JTAG Protocol is still supported for backward compatibility, but now deprecated. All remote connection should be through the GDB Remote Serial Protocol. |
A remote target should implement the server side of either or both of the GDB Remote Serial Protocol and the OpenRISC 1000 Remote JTAG Protocol. The target may be the Or1ksim architectural simulator or a driver for physical hardware, such as the USB JTAG connector made by ORSoC AB.
There are two variants of the Debug Unit for the OpenRISC 1000, with slightly different JTAG interfaces.
The original JTAG interface was created as part of the OpenRISC SoC project, ORPSoC [4]. It provides three scan chains: one to access all the Special Purpose Registers, one to access external memory and one providing control of the CPU. The control scan chain can reset, stall or trace the processor.
A new JTAG interface was provided by Igor Mohor in 2004 [5]. It provides the same access to Special Purpose Registers and external memory, but offers a simpler control interface offering only the ability to stall or reset the processor.
When connecting via the GDB Remote Serial Protocol, the version of JTAG implemented does not matter—the RSP server will resolve the issue automatically. However for direct connection, or remote connection via the OpenRISC 1000 Remote JTAG Protocol, the type of JTAG interface must be specified.
A detailed description of the OpenRISC 1000 port of GDB is provided in the GDB "howto" from Embecosm [2]. An explanation of the RSP server implementation is provided in the RSP "howto" from Embecosm [3].
This version of GDB has been tested with version 0.3.0 release candidate 2 of Or1ksim as described in Section 3.7. This implements the original ORPSoC version of the Debug Unit. The OpenRISC 1000 port of GDB is designed to support either interface, controlled by GDB commands described in the User Guide.
| Note |
|---|---|
To date there has been limited testing of GDB 6.8 with real hardware. User feedback on experience with real hardware is welcomed. |
Download clean versions of the distribution and the patch file for OpenRISC 1000 from the locations given in Section 2.3.
| Important |
|---|---|
Ensure the version number (6.8) is exactly the same |
Unpack the downloaded source code. No patching is needed.
This version of the application note describes Linux kernel version 2.6.23, for which a much simplified build has been developed.
Download clean versions of the distribution and the patch file for OpenRISC 1000 from the locations given in Section 2.3.
| Important |
|---|---|
Ensure the version number (2.6.23) is exactly the same. |
Unpack the downloaded source code and apply the patch file (See Section 3.1.1 for an example of how to apply a patch file.).
The configuration options for a Linux kernel are held in the
.config file in the top directory of the
kernel. The code patched for OpenRISC sets up a suitable file in
.config.
| Note |
|---|---|
Previous versions of these instructions required copying of a file
into the |
The kernel can now be configured using its graphical configuration tool.
make menuconfig ARCH=or32 CROSS_COMPILE=/opt/or32/bin/or32-uclinux-
Use the cursor keys to move to the
sub-menu and select it. There
is only one entry, , which should be deselected
(press N).
| Note |
|---|---|
The Ethernet code does not appear to work reliably in the Or1ksim simulator, which is why it is deselected here. |
Having made this change, exit up through the menus and from the
configuration system, saving the configuration file when
prompted. As well as creating the .config
file, this will have also linked in the correct
include files for the Linux kernel build.
The build of Linux makes use of a RAMdisk filing system. For initial building, the patched source includes an image from MOF which is suitable. This provides a set of BusyBox utilities which can be used when Linux starts up.
| Note |
|---|---|
Previous versions of these instructions required copying of a file into the RAMdisk image. This is no longer required. |
uClibc is a C library for use particularly in embedded environments. It is substantially smaller than the full glibc library.
Download clean versions of the distribution and the three patch files for OpenRISC 1000 from the locations given in Section 2.3.
| Important |
|---|---|
Ensure the version number (0.9.28.3) is exactly the same. |
Unpack the downloaded source code. Apply the main MOF patch to the
main uClibc directory (See Section 3.1.1 for an example
of how to apply a patch file.). Apply the supplementary MOF
patch file to the libc sub-directory of the
uClibc directory not the main directory.
A further patch is required to ensure uClibc will work correctly
with the OpenRISC tool chain. The linker can get confused about the
stdio library initialization and termination. To avoid this, dummy
versions of __stdio_init and
__stdio_term must be added. Apply the
Embecosm patch file to the main directory to fix these problems.
The patches must be applied in this order. A typical set of commands would be:
cd uClibc-0.9.28.3 bzcat -dc ../uClibc-0.9.28-or32-unified.bz2 | patch -p1 cd libc bzcat -dc ../../uClibc-0.9.28-or32-libc-support.bz2 | patch -p1 cd .. bzcat -dc ../embecosm-esp2-or32-uclibc-0.9.28.3-patch-2.0.bz2 | patch -p1
Additional configuration options specific to the OpenRISC core are
provided in the patched source tree. Make these available by linking
to Config in the main directory
ln -s extra/Configs/Config.or32 Config
Configuration for uClibc is via the file
.config in the main directory. Like Linux,
uClibc also provides a graphical configuration tool to set up
.config.
The MOF website provides a template .config
file. Copy this from the location given in Section 2.3 into .config.
![[Caution]](./images/caution.png) | Caution |
|---|---|
The patched source tree contains a file,
|
The configuration tool is not able to set every parameter, so edit
.config with a text editor. Change the line
setting CROSS_COMPILER_PREFIX option to read.
CROSS_COMPILER_PREFIX="or32-uclinux-"
| Important |
|---|---|
This is a key change, and ensures the build of uClibc picks up the OpenRISC 1200 tool chain and not the standard workstation compiler |
Run the configuration tool, so the remaining changes can be made with the graphical parameter editor.
make menuconfig
| Note |
|---|---|
The configuration tool will give two warnings that configuration symbol
|
Use the cursor keys to move to the
sub-menu and select it. Move to
the entry and deselect it
(press N). Then move further
down to the last entry and set this to point
to the main Linux distribution directory.
Return back to the main menu and select the
sub-menu. Move to the
entry and deselect it.
Return back to the main menu and select the
sub-menu. Set the entries for
both the RUNTIME_PREFIX and
DEVEL_PREFIX options to be the main installation
directory (in the examples here /opt/or32).
Return to the main menu and exit, saving the new configuration file.
The uClibc library is built and installed using make.
make all
make install
| Note |
|---|---|
There is no need to set the |
| Important |
|---|---|
The uClibc make file dependencies are not complete. If any parameters are changed, run make clean before rebuilding. |
The previous build of GCC was not aware of Operating System specific include files and libraries. The compiler can now be rebuilt, so that it correctly picks up the Linux and uClibc include files and libraries.
Return to the build directory used to build the original GCC
compiler (see Section 3.2.2). Delete the
contents and reconfigure GCC this time to include a local prefix
for searching (using the --with-local-prefix option
to configure).
cd builddir-gcc
rm -rf *
../gcc-3.4.4/configure --target=or32-uclinux --prefix=/opt/or32 \
--enable-languages=c --with-local-prefix=/opt/or32/or32-uclinux
The compiler will preferentially consider include and library files
within the /opt/or32/or32-linux directory (in
other words the target specific sub-directory of the installation
directory), which can be used for all the Linux and uClibc
files.
The build and install process for the compiler is identical:
make all
make install
The final stage is to populate the target specific directory. GCC
will look here for a sys-include
directory. This can be linked to the parent
include directory, which will have been
populated by the uClibc install process (including any Linux
include files used by uClibc).
The lib sub-directory will be used by the linker
from GCC to complete linking of compiled programs. This cannot be
simply linked, since not all of the main library should appear
here. Instead, the relevant library and object files are linked
here.
In the examples given here, the install directory is
/opt/or32. The following commands would set the
target specific directory up appropriately.
cd /opt/or32/or32-uclinux
ln -s ../include sys-include
cd lib
ln -s ../../lib/*.* .
| Important |
|---|---|
The MOF instructions suggest copying the library files into the
|
The OpenRISC architectural simulator, Or1ksim, is a traditional interpreting ISS, which also models some of the standard ORPSoC components (memory, UART etc). It represents work in progress. Having been dormant for two years, the project is now active again.
This section is mainly concerned with Or1ksim 0.3.0 candidate release 2 and later, since this version is the first to implement the GDB Remote Serial Protocol. This is now the recommended interface from GDB to Or1ksim. The old OpenRISC 1000 Remote JTAG Protocol is still part of the system, but is now deprecated.
Since version 0.3.0 is still regarded as a development version of the tool. This section also covers the use of the stable version 0.2.0.
Download clean versions of the distribution and the patch file for OpenRISC 1000 from the locations given in Section 2.3. Choose either the development version (0.3.0rc2, recommended) or the old stable version (0.2.0).
| Important |
|---|---|
Ensure the version number (0.3.0rc2 for the development version or 0.2.0 for the stable version) is exactly the same. Note in particular that the release candidate versions of version 0.2.0 (0.2.0rc1, 0.2.0rc2 and 0.2.0rc3) are not suitable. |
Unpack the downloaded source code. If using the stable version (0.2.0) apply the patch file (See Section 3.1.1 for an example of how to apply a patch file.). No patching is required for the development version (0.3.0rc2).
There are several issues in the stable version (0.2.0) of Or1ksim which are fixed by the patch file.
A bug in connecting to the simulator from GDB via the JTAG
port (bad call to fcntl).
Several bugs in using the simulator with an xterm connected to the UART
A problem with accessing strings when using diagnostic printf
(the simprintf() function).
A problem with the caches being accessed, even when disabled. This problem is only partially fixed.
A number of changes in the Special Purpose Register bit configurations in the OpenRISC 1000 architecture. These have changed since Or1ksim was first created.
A number of changes to ensure the simulator works correctly with GDB 6.8.
The patch also adds a function to print a single
character via a NOP
trap. NOP 1 is adopted for this
function. This is particularly valuable when
simprintf is not usable, during
MMU setup.
All these changes (and many other improvements) are already incorporated in the development version (0.3.0rc2), which thus needs no patching.
Configuration is similar to that of the GNU tool chain, using a configure script, to set a target and an install directory.
It is a good idea not to use the same install directory for binaries that was used for the tool chain. The tool chain is aimed at cross compiling for the OpenRISC 1000 architecture and any include files etc will be specific to that architecture. By contrast Or1ksim is a native application for the workstation architecture (e.g. a PC). So a typical configuration would be:
mkdir builddir_or1ksim
cd builddir_or1ksim
../or1ksim-0.3.0rc2/configure --target=or32-uclinux --prefix=/opt/or1ksim
| Note |
|---|---|
The configuration target, |
| Note |
|---|---|
The |
Building and installing uses the make file generated by the
configuration stage. There is no use of the make check command,
since there is a separate test suite for use with the simulator (see
Section 4.1). Assuming the install
directory has been chosen as /opt/or1ksim,
suitable commands would be:
make
make install
A new command, or32-uclinux-sim will now be
present in the opt/or1ksim/bin directory.
If Or1ksim has been installed as recommended in a different directory to the remainder of the tool chain, that directory must be added to the search path. For sh and bash users:
export PATH=/opt/or1ksim/bin:$PATH
For csh and tcsh users:
setenv PATH /opt/or1ksim/bin:$PATH
| Tip |
|---|---|
As with the main tool chain install directory, it is useful to add
these environment setup commands to |
Or1ksim comes with a test suite of small programs to exercise the simulator. As a major test, the Linux 2.6.23 kernel can be run on the simulator.
| Caution |
|---|---|
The Or1ksim test suite is known to have considerable limitations. It should be considered only a rudimentary test that the tool chain and architectural simulator are working. |
The test suite is found in the testbench
sub-directory of the main Or1ksim distribution.
The test suite is configured using a configure script. This
specifies both the target and the host (which forces
cross-compilation for the OpenRISC 1000 architecture). Since the
tests are not to be installed, there is no need to use the
--prefix option. The configuration command should
therefore be as follows.
cd or1ksim-0.2.0/testbench
./configure --target=or32-uclinux --host=or32
| Caution |
|---|---|
There appears to be a time stamp problem with the configure script, so that the first time it is run it attempts to regenerate itself (without success). If this occurs, then just rerun the command—it only fails once. |
Configuration creates a make file. make all will build all the tests, followed by make check to run the tests.
| Caution |
|---|---|
The time stamp problem with the configure script may appear here when running make all, so that the first time it is run it attempts to regenerate itself (without success). If this occurs, then just rerun the make all command—it only fails once. |
Each test, if successful should output the following two lines.
report(0xdeaddead);
exit(0)
In the event of a test failing, its output can be found in
/tmp/ and
a count of the cycles executed in
testname_output/tmp/ .
testname_error
| Note |
|---|---|
The make check command does a simple test that the last two lines
of output are as indicated above to determine success or
failure. In practice, one or two tests (commonly the
multiplication test and frame buffer test) may report failure, due
to Or1ksim warning messages being interspersed between and after
these two lines. Manual inspection of the relevant output files in
the |
Or1ksim is configured via a configuration file, which is specified
by the -f. This is used to specify the detailed
behavior of the CPU (virtual memory, caches etc), the various
memories to be attached and the behavior of the various peripherals
modeled. The structure of the configuration file is described in
comments within the default configuration file
(sim.cfg supplied in the main directory of
Or1ksim).
The Linux distribution, as patched for OpenRISC, is supplied with
a configuration file, sim.cfg in its main
directory. Three changes are needed to this, for the Linux kernel
built in Section 3.4.
| Caution |
|---|---|
Do not attempt to use the |
Find the line beginning section sim
in the file sim.cfg in the main Linux
directory. This is followed by lines giving parameter values for the
simulation. Linux was built to run at a notional 100MHz. The
specification of the time taken by one clock cycle is out by a
factor of 1000. Change the value of clkcycle option
to 10ns.
Find section uart. This specifies
that the channel for I/O should be via TCP port 84. This will
probably fail, since the port is in the Well Known Ports range,
requiring administrative privileges. If it is desired to run
Linux through a telnet link, this should be changed to a value in
the Dynamic Range (49152-65535). A separate window can then connect
to this port using telnet.
Rather more elegant is to use an xterm for output. For this, change the channel specification to:
channel = "xterm:"
Find section ethernet. Linux was
built without Ethernet, so this should be disabled. Set the
enabled option to 0.
The Linux kernel should now just boot up. Run Or1ksim from the main Linux directory:
cd linux-2.6.23
or32-uclinux-sim -f sim.cfg vmlinux
| Note |
|---|---|
Or1ksim will give a number of warnings about invalid
parameters. This is because the |
Linux will initially show that it is copying from ROM to main memory, and then booting.
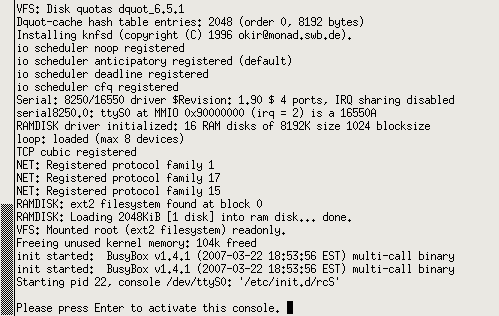
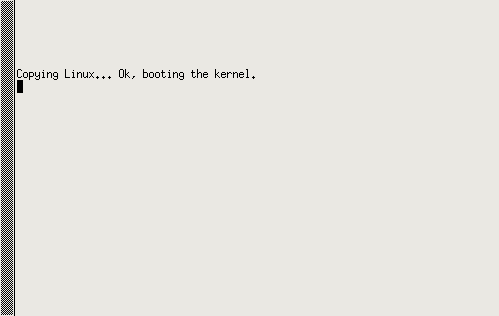 |
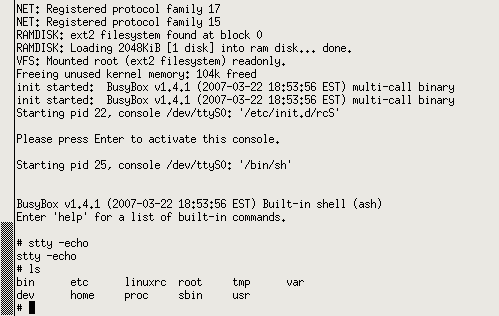
There is then a pause of one or two minutes, while the Linux kernel boots prior to configuring the UART I/O. Once that point is reached, then standard Linux boot messages will begin to appear. At the end of boot, the terminal will prompt to initiate a console session.
 |
The core Linux commands are available, provided within a BusyBox environment. The default terminal behavior echoes back what is typed, so the initial command should be.
stty -echo
Normal Linux behavior is then available.
 |
Custom programs may be added to the Linux environment by compiling them and adding them to the RAMdisk image. Instructions for this are provided on the MOF website.
Debugging with Or1ksim is much easier with the release of GDB 6.8 These are some suggestions for approaches that work. Full details will be found in the GDB User Guide [1].
| Note |
|---|---|
With the introduction of the GDB Remote Serial Protocol interface in GDB 6.8 release 2.0 for OpenRISC 1000 and Or1ksim 0.3.0rc2 remote debugging has changed considerably. The instructions here have changed significantly since the last issue of this application note. |
This requires the GNU debugger built for cross platform use with
OpenRISC (see Section 3.3). Or1ksim contains some
guidelines in the file README.gdb in its main
directory, but these relate to the old GDB 5.3 version. The
definitive instructions are in the GDB User Guide [1].
To use the remote debug feature of Or1ksim, enable the
debug section in the simulator configuration
file. Set enabled option to 1 and
rsp_enabled option to 1. The server port is not
chosen at random, but set by the server_port option
here. Good practice would recommend using a value in the Dynamic Range
(49152-65535), such as the 51000 used in the default configuration
file. Or1ksim should be started without specifying any image file.
In a separate window start the OpenRISC 1000 GDB command (or32-uclinux-gdb).
| Tip |
|---|---|
For those who like their debugging to be graphical, it is perfectly feasible to run GDB under DDD. The following would be a suitable DDD command line. ddd --debugger or32-uclinux-gdb --gdb |
There are three stages to setting up GDB.
Load a local symbol table (using the GDB file) command.
Connect to the remote simulator via RSP (using the GDB target) command.
Load the program on the remote simulator via RSP (using the GDB load) command.
A typical set of commands (once inside GDB) to debug a simple "Hello World" program on Or1ksim on the same machine, with RSP connecting through port 51000 would be:
file hello_world
target remote :51000
load hello_world
At this point the usual GDB commands to breakpoint, continue and examine programs are available. This includes symbolic disassembly of the code.
| Note |
|---|---|
GDB connecting through RSP with target remote is connecting to a target which is already executing, but has stalled. Thus it is inappropriate to use the run command (which specifies a new program to run). Instead the continue and step commands are used. The load command will reset the program counter to the entry point of the program. So a subsequent continue will cause the newly loaded program to execute from its entry point. |
GDB can be used to debug Linux if required, but there are difficulties with handling virtual addresses with a "bare metal" debugger. A page miss would require execution of the relevant exception handler. As a consequence, all access via the current GDB implementation is to and from physical addresses, bypassing caches and MMUs if present.
The eventual solution will be to port KGDB (kgdb.linsyssoft.com), which knows how to handle memory in the kernel.
Sometimes just inserting printk statements is
sufficient. The problem is that the kernel print function,
printk does not work until the serial driver is
up and running. Problems earlier than this (very likely during the
early stages of porting) will be hidden.
The solution is to patch printk to use the
internal simulator print facilities. Use of Or1ksim
simprintf direct from printk
is not appropriate, since its argument is a pointer and at the time of
calling, the whole virtual memory system may be in flux.
However printk calls vprintk
which does the complex work of building the final output string from
the format string and arguments. This string can then be printed a
character at a time using the Or1ksim NOP_PUTC
feature. Since characters are passed in registers, not as pointers, the
issue of virtual memory does not arise.
The implementation of the printk can be found
in kernel/printk.c in the Linux directory. In
there find the vprintk function. Immediately
before it add two functions to write a string one character at a time
using the Or1ksim NOP_PUTC feature.
#define NOP_PUTC  4

static void simputc( char c )
{
        asm( "l.or   r3,r0,%0" : : "r" (c));
        asm( "l.nop  %0"       : : "K" (NOP_PUTC));

}       /* simputc() */


static void simputs( char *str )
{
        int  i = 0;

        for( i = 0 ; str[i] != '\0' ; i++ ) {
        simputc( str[i] );
        }
}       /* simputs() */
Then find the line in vprintk where the formatted
string is constructed in the printk_buf:
printed_len = vscnprintf(printk_buf, sizeof(printk_buf), fmt, args);
Immediately after this use the new simputs
function to print this string to the console via Or1ksim.
simputs( printk_buf ); /* For Or1ksim */
Rebuild Linux (see Section 3.4) and run again under the simulator. The Linux kernel output will appear in the window from which the simulator was run.
   <... Or1ksim startup messages ...>

Copying Linux... Ok, booting the kernel.
****************** counters reset ******************
cycles 145321226, insn #9988651
****************** counters reset ******************
<5>Linux version 2.6.23-or32 (jeremy@thomas) (gcc version 3.4.4) #3 Sat Jun 28 1
9:30:06 BST 2008
Detecting Processor units:
  Signed 0x391
Setting up paging and PTEs.
write protecting ro sections (0xc0002000 - 0xc024c000)
Setting up identical mapping (0x80000000 - 0x90000000)
Setting up identical mapping (0x92000000 - 0x92002000)
Setting up identical mapping (0xb8070000 - 0xb8072000)
Setting up identical mapping (0x97000000 - 0x97002000)
Setting up identical mapping (0x99000000 - 0x9a000000)
Setting up identical mapping (0x93000000 - 0x93002000)

   <... Lots more kernel messages ...>

<5>VFS: Disk quotas dquot_6.5.1
Dquot-cache hash table entries: 2048 (order 0, 8192 bytes)
<6>Installing knfsd (copyright (C) 1996 okir@monad.swb.de).
<6>io scheduler noop registered
<6>io scheduler anticipatory registered (default)
<6>io scheduler deadline registered
<6>io scheduler cfq registered
<6>Serial: 8250/16550 driver $Revision: 1.90 $ 4 ports, IRQ sharing disabled
<6>serial8250.0: ttyS0 at MMIO 0x90000000 (irq = 2) is a 16550A

   <... Serial I/O now working! ...>

init started:  BusyBox v1.4.1 (2007-03-22 18:53:56 EST) multi-call binary
Starting pid 22, console /dev/ttyS0: '/etc/init.d/rcS'
The kernel does not lose messages, it saves them until serial I/O is available and then prints them, so once the 8250 is initialized, everything will appear on the console and on the xterm used by the Or1ksim UART.
That concludes this application note. Enjoy the tools!
[1] Debugging with GDB: The GNU Source-Level Debugger, Richard Stallman, Roland Pesch, Stan Shebbs, et al, issue 9. Free Software Foundation 2008 . http://sourceware.org/gdb/current/onlinedocs/gdb_toc.html
[2] Embecosm Application Note 3. Howto: Porting the GNU Debugger: Practical Experience with the OpenRISC 1000 Architecture. Embecosm Limited, August 2008.
[3] Embecosm Application Note 4. Howto: GDB Remote Serial Protocol: Writing a RSP Server. Embecosm Limited, November 2008.
[4] OpenRISC 1000: ORPSoC Damjan Lampret et al. OpenCores http://opencores.org/projects.cgi/web/or1k/orpsoc
[5] SoC Debug Interface Igor Mohor, issue 3.0. OpenCores 14 April, 2004 . http://opencores.org/cvsweb.shtml/dbg_interface/doc/DbgSupp.pdf