Introduction
In this blog post we give an introduction to the topic of facial recognition and describe our approach to the problem introduced in the previous blog post.
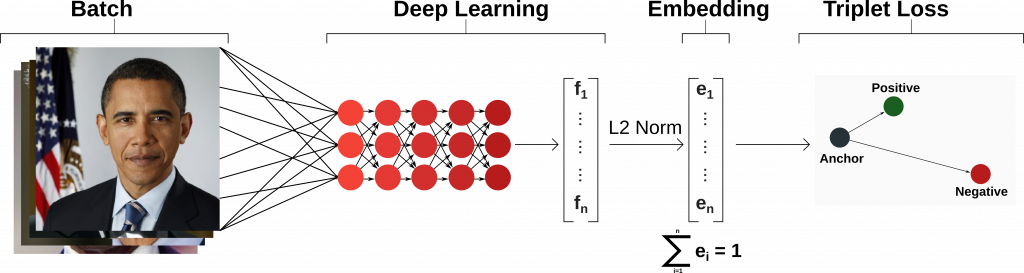
When deciding to implement facial recognition, FaceNet was the first thing that came to mind. FaceNet is a face recognition pipeline that learns mapping from faces to a position in a multidimensional space where the distance between points directly correspond to a measure of face similarity.
The following extract from the FaceNet paper gives an overview of its main concept:
“[…] we strive for an embedding f(x), from an image x into a feature space, such that the squared distance between all faces, independent of imaging conditions, of the same identity is small, whereas the squared distance between a pair of face images from different identities is large.
This allows the faces for one identity to live on a manifold, while still enforcing the distance and thus discriminability to other identities.”
A TensorFlow implementation of FaceNet is currently available on GitHub.
Building on the previous work on FaceNet, our solution is formulated in three stages:
1. Pre-processing – a method used to take a set of images and convert them all to a uniform format – in our case, a square image containing just a person’s face. A uniform dataset is useful for decreasing variance when training as we have limited computational resources when using the Edge TPU.
2. Embedding – a process, fundamental to the way FaceNet works, which learns representations of faces in a multidimensional space where distance corresponds to a measure of face similarity.
3. Classification – the final step which uses information given by the embedding process to separate distinct faces.
One further feature we would also like to implement is weight imprinting. Weight imprinting is a method of splitting the training process into two steps, with the first step training the whole model on a large dataset, and the second step training the last layer only on new data, while utilizing the knowledge gained in the previous step. Weight imprinting allows learning to happen on-device with few sample images required. It can learn intrinsic properties of a face that it has never seen before and compare these with what it has learnt from a known dataset.
The architecture of our solution
Given the three stages we described earlier, we constructed an architecture for our specific implementation, taking into account the practicalities of implementing it on the Edge TPU.
The architecture will use the following method:
1. Using an alignment script to perform preprocessing;
2. Training a deep Mobilenet model to recognize faces, then splitting it at a layer which represents embeddings;
3. Attaching a single layer classification model and training it using weight imprinting.
Aligning
The first step of both the training and the inference process is to align images. This will always occur on a machine other than the Edge TPU, since the Edge TPU environment cannot support the libraries required. We are currently running the align_dataset_mtcnn.py script from the Facenet GitHub repository.
By executing the script, we can specify the size of the face thumbnails and have them aligned.
This step is important to ensure consistency within the dataset. Without this consistency, a model would have to learn to classify a dataset with unnecessary variance between images of the same face. A model powerful enough to do this would likely be too complex for a first attempt at implementing something on the Edge TPU.
In our case, to process the images, we had to run the script on a server machine as the local machine would require a substantial amount of time.
The command executed was:
for N in {1..20}; do \
python3 src/align/align_dataset_mtcnn.py \
—image_size 182 \
—margin 44 \
—random_order \
—gpu_memory_fraction 0.05 \
& done
It took us roughly 30 minutes on a 20 cores server to align the CASIA Webface dataset containing hundreds of thousands of images. Comparitively we would expect a similar script running on a MacBook Pro to need at least 2.5 hours to run.
Embedding
In contrast to alignment, embedding and classification are intended to be run on the Edge TPU.
The embedding model is a concatenation of convolution layers which looks for features and maps them to a multidimensional space. To obtain our embedding layer, we started with a pre-trained version of the MobileNet model — which I will go into details about on the next post — and retrained it. It is important to note that we used the whole model, meaning that it both creates embeddings as well as classifies them. However, the model gets split later on so we can use its output (embeddings) as input to a single layer classification model.
For training, we made use of the mobilenet_v1_l2norm_train.py script which takes as input a dataset in TFRecord format and checkpoints, which were provided with the pre-trained model.
We had to then save a GraphDef* of the model and freeze the graph. We achieved this with the new checkpoints created while training. Importantly compared to the FaceNet classifier we previously described, we also stripped out the L2-norm operator as it is not supported by the Edge TPU.
To freeze the graph we used the Tensorflow tool freeze_graph, a simple procedure that only requires the post-training checkpoints. The model got stripped of the L2-norm operator by using the transform-graph tool, taking the frozen graph as input.
*More information about what a graph object is in Tensorflow can be found here.
Classification
For classification, we had to split the model into two parts — the embedding extractor, and a classification layer — and then re-join them.
The reason for this split is that, as mentioned before, we plan to use the embeddings as input for a single layer classification model. This step ensures that we are able to use weight imprinting, meaning that the model will be able to train — on the Edge TPU — on a limited dataset (from around five to ten images) to recognise a face that it has never seen before.
To achieve this, we first converted the entire frozen graph to a TFLite file using tflite_convert which takes the GraphDef file and outputs a TFLite file.
We then created the base graph as its own file using toco as tflite_convert doesn’t support .tflite files as input.
From this, we have our embedding extractor completely separated from the classification layer. We then create the head graph using toco and then compiled the base graph with the Edge TPU compiler.
The last step was to re-join the compiled base graph and the head graph using Google’s join_tflite_models tool.
Summary
We started by analysing the FaceNet paper and coming up with a three step plan for a facial recognition system: pre-processing, embedding and classification.
To pre-process we used a script from the FaceNet git repository on the server machine that we have available. We then retrained a pre-trained model on a dataset of our choice and froze its graphs. Finally, we split the model into a base (embeddings) and a head (classification) to allow us to do weight imprinting later on. We should then have a working compiled model trained on the dataset of our choice.
The next blog post in this series will be an account of the gory details of implementing this model architecture on the board.